Configuring LVM
Guide to Installing Cluster Manager (Peacemaker) and Cluster File System (GFS2)
Due to the use of CLI commands, the parameters and variable names in the illustrative images may differ from the actual commands
1. Installing pcs on both nodes
- PCS (Pacemaker/Corosync Configuration System) is a cluster management tool. To install pcs on both nodes, use the following commands:
sudo dnf --enablerepo=highavailability,resilientstorage -y install lvm2-lockd gfs2-utils dlm pcs pacemaker fence-agents-aws
sudo systemctl start pcsd.service
sudo systemctl enable pcsd.service
Here:
- lvm2-lockd, gfs2-utils, dlm: Essential packages for the GFS2 file system and DLM (Distributed Lock Manager).
- pcs, pacemaker: Necessary packages for cluster management.
- fence-agents-aws: Package for the fencing agent, especially useful in AWS environments.
- Then, set up a password for the hacluster account (enter the same password on both nodes). Start and enable the pcsd service for managing and configuring Pacemaker.
sudo passwd hacluster
- The above command sets a password for the hacluster account, used for authentication between nodes in the cluster.
- Configure the pcs cluster on the main node. Choose one node as the main node for cluster configuration:
sudo pcs host auth <dns name of node1> <dns name of node2> -u hacluster
sudo pcs cluster setup macluster <dns name of node1> <dns name of node2>
sudo pcs cluster enable --all
sudo pcs cluster start --all

Explanations:
- sudo pcs host auth: Authenticates the nodes in the cluster.
- sudo pcs cluster setup: Creates and configures a new cluster.
- sudo pcs cluster enable –all and sudo pcs cluster start –all: Activates and starts the cluster on all nodes.
- Configure the Fencing Agent on any node. The fencing agent ensures the integrity of the cluster by isolating a problematic node.
sudo pcs stonith create clusterfence fence_aws
access_key=<your access key>
secret_key=<your secret key>
region=us-east-1
pcmk_host_map="<dns name of node1>:Instance-ID-1;<dns name of node2>:Instance-ID-2"
power_timeout=240 pcmk_reboot_timeout=480 pcmk_reboot_retries=4

Here:
- fence_aws: AWS-specific fencing agent.
- access_key, secret_key: AWS authentication details.
- region: AWS region where the nodes are operating.
- pcmk_host_map: Maps DNS of nodes to Instance IDs in AWS.
- power_timeout, pcmk_reboot_timeout, pcmk_reboot_retries: Configuration parameters for rebooting.
2) Installing gfs2
After completing cluster configuration, set up GFS2. Red Hat Enterprise Linux (RHEL) Resilient Storage Add-On provides GFS2, and it relies on the RHEL High Availability Add-On for the necessary cluster management. However, in this lab, we will use packages provided with CentOS 9 stream.
- On both nodes:
sudo mkdir /var/lib/mysql
-
On both cluster nodes, configure the use_lvmlockd option in /etc/lvm/lvm.conf to use use_lvmlockd=1
-
On any node, set the global Pacemaker parameter no-quorum-policy to freeze:
sudo pcs property set no-quorum-policy=freeze
- On any node: Set up a dlm resource. This is a necessary dependency for configuring the GFS2 file system in the cluster. This example creates the dlm resource as part of a resource group named locking.
sudo pcs resource create dlm --group locking ocf:pacemaker:controld op monitor interval=30s on-fail=fence
- Clone the locking resource group so the resource group can operate on both cluster nodes.
sudo pcs resource clone locking interleave=true
- Set up an lvmlockd resource as part of the locking resource group.
sudo pcs resource create lvmlockd --group locking ocf:heartbeat:lvmlockd op monitor interval=30s on-fail=fence
- Check the status of the cluster to ensure that the locking resource group has started on both cluster nodes.
sudo pcs status –full
- On one cluster node, create a shared volume group. The volume group will contain a GFS2 file system.
sudo pvcreate /dev/nvme1n1
sudo vgcreate --shared shared_vg1 /dev/nvme1n1
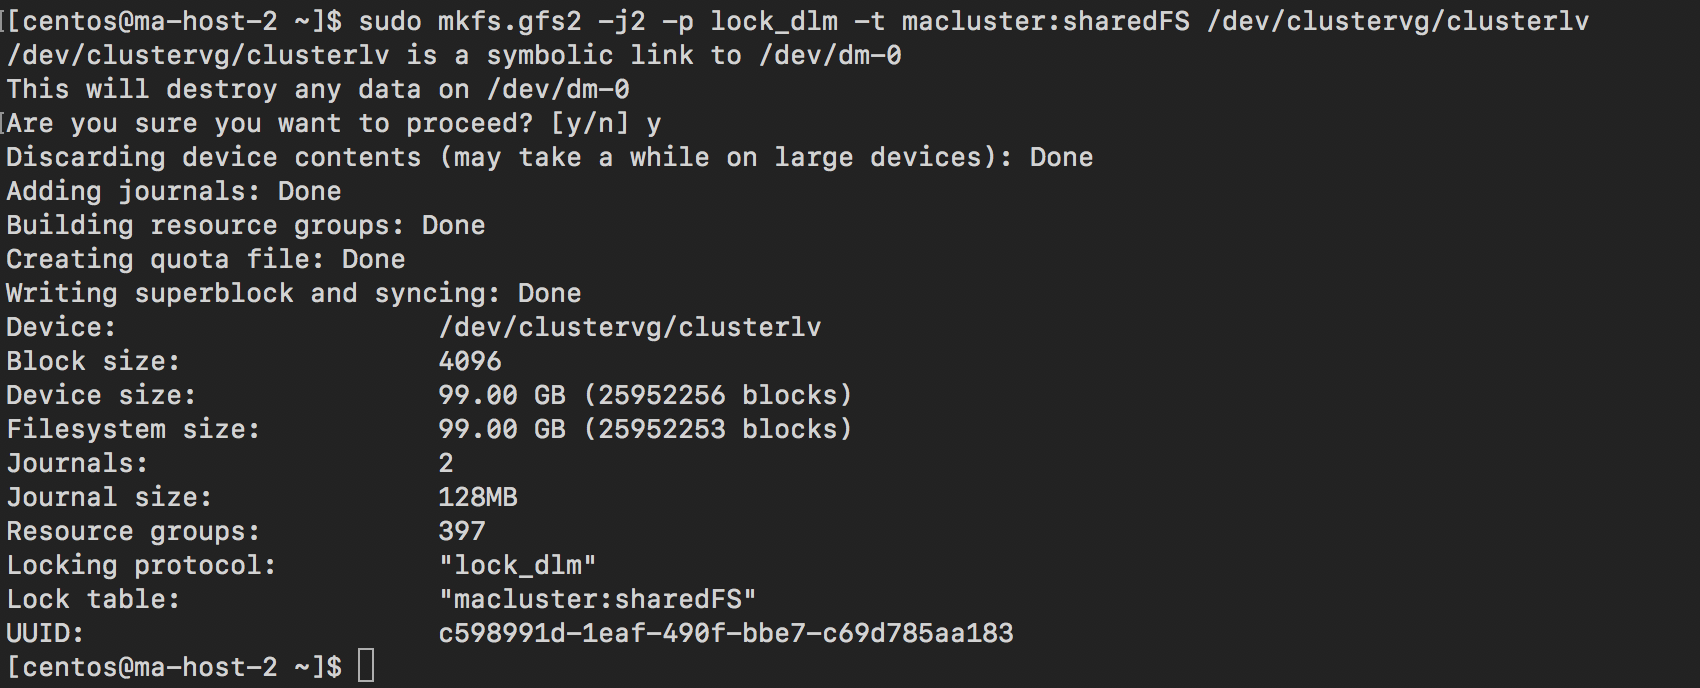
- On one node in the cluster, create shared logical volumes and format the volumes with the GFS2 file system.
Note: Since we will install mysql on this GFS2 file system, we will mount the file system at /var/lib/mysql. /var/lib/mysql is the default directory for Mysql.
sudo lvcreate --activate sy -L5G -n shared_lv1 shared_vg1
sudo mkfs.gfs2 -j2 -p lock_dlm -t macluster:gfs2-demo1 shared_lv1
- Create an LVM-activate resource for each logical volume to automatically activate that logical volume on all nodes.
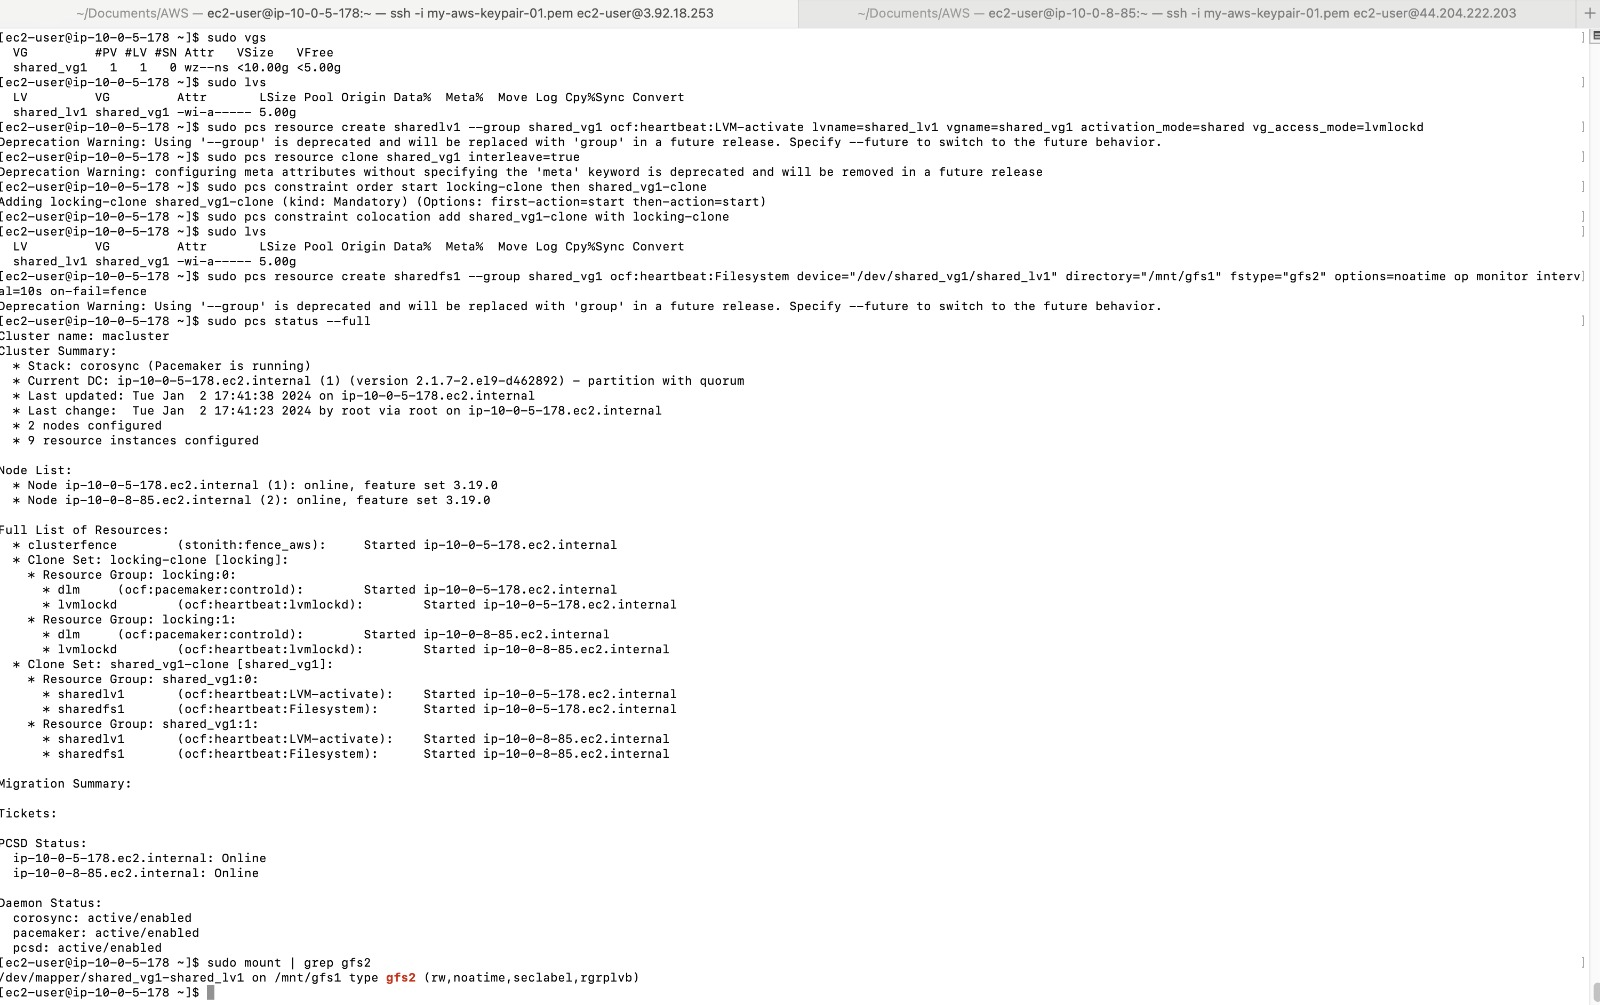
sudo pcs resource create sharedlv1 --group shared_vg1 ocf:heartbeat:LVM-activate lvname=shared_lv1 vgname=shared_vg1 activation_mode=shared vg_access_mode=lvmlockd
- Clone the two new resource groups.
sudo pcs resource clone shared_vg1 interleave=true
- Configure order constraints to ensure that the locking resource group including dlm and lvmlockd resources starts first.
sudo pcs constraint order start locking-clone then shared_vg1-clone
- Configure colocation constraints to ensure that the vg1 resource group starts on the same node as the locking resource group.
sudo pcs constraint colocation add shared_vg1-clone with locking-clone
- On both nodes in the cluster, verify that the logical volumes are active.
[root@z1 ~]# sudo lvs
[root@z2 ~]# sudo lvs
- Create a file system resource to automatically mount each GFS2 file system on all nodes.
sudo pcs resource create sharedfs1 --group shared_vg1 ocf:heartbeat:Filesystem device="/dev/shared_vg1/shared_lv1" directory="/var/lib/mysql" fstype="gfs2" options=noatime op monitor interval=10s on-fail=fence
- Verify that the GFS2 file system has been mounted on both cluster nodes.
[root@z1 ~]# sudo mount | grep gfs2
[root@z2 ~]# sudo mount | grep gfs2
- Check the status of the cluster.
sudo pcs status --full
- Image at node-01
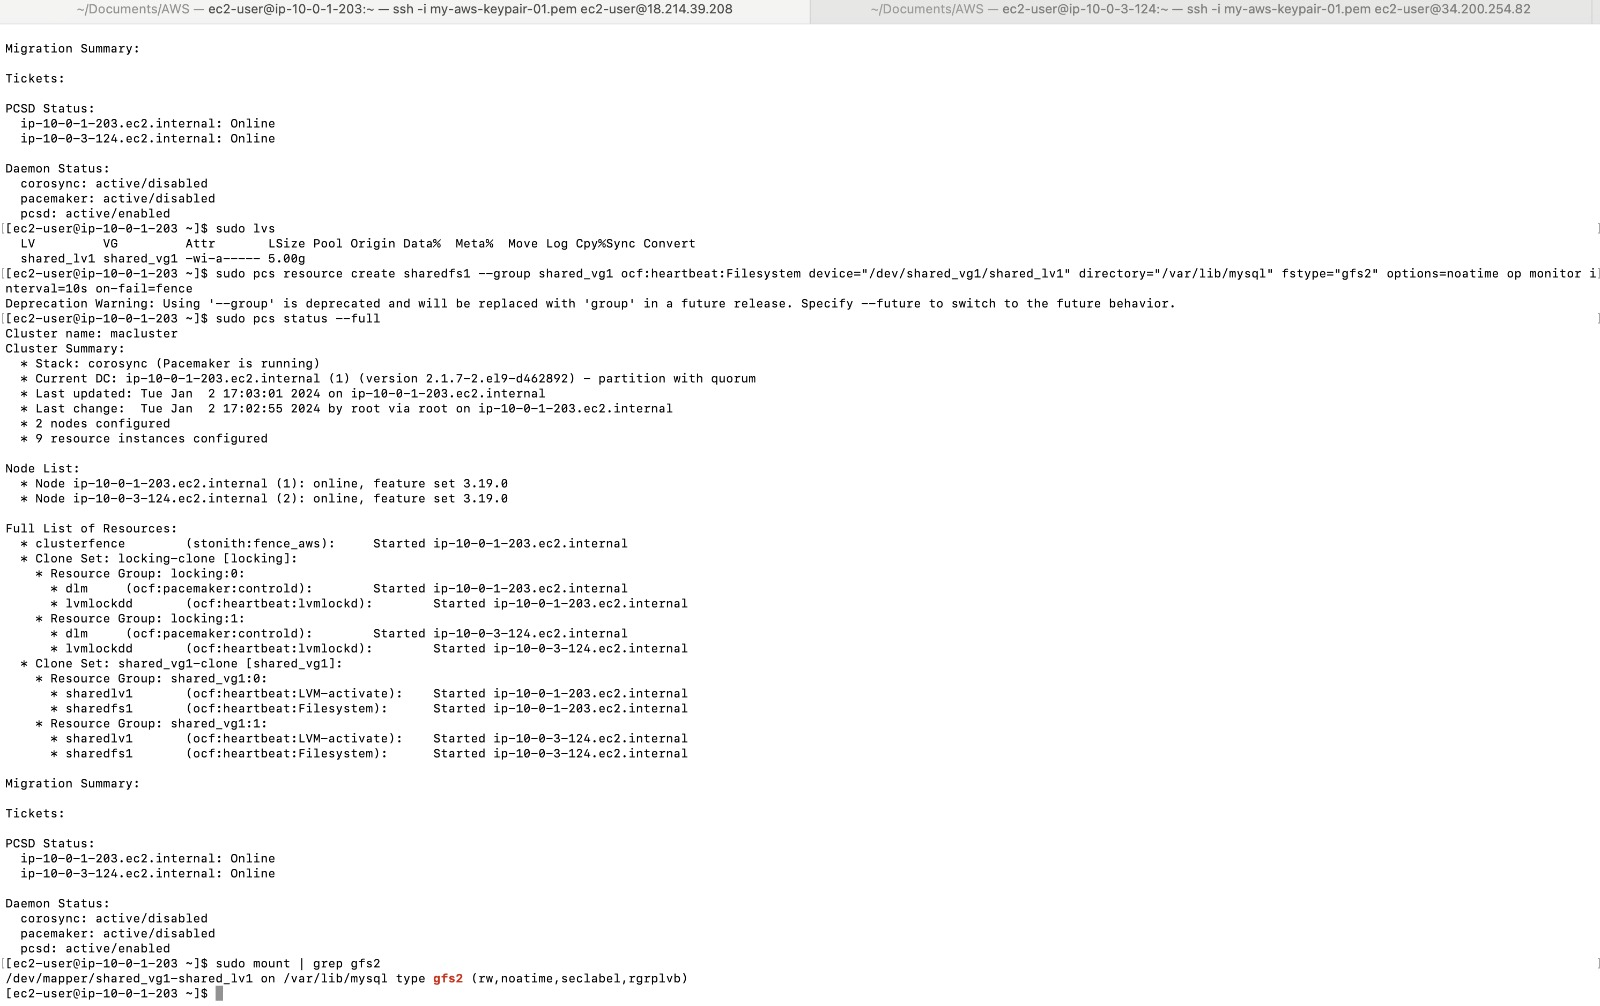
- Image at node-02